Showing posts with label project. Show all posts

Monday, April 15, 2013

Let's finish a basement: Getting started

My family has decided it's time to finish our basement. When we bought the house we new this would be on our project list. We've lived in our home for almost 6 years and now that our kids are getting bigger it's getting a little cramped. We figured the easiest way to add space is to make the space we already have livable.

First things first. My husband and I are DIY-ers. We are not professionals, but we do have professionals in our family who have all the answers to our many questions. Since we are tackling this basement remodel together and it's our first big project, we have a ton of questions.

Next sit down as a "team" and come up with a design. We (my husband & I) scoured the Internet looking for a website that would allow us to design our own floor plan and we wanted it to be free. We found a couple, but the one we decided to use for this project was  www.floorplanner.com

www.floorplanner.com


Floor planner is a easy to use site that allowed us to enter our measurements and play around with wall placement. As you can see it also allowed us to put furniture pieces to show the flow of the rooms.
www.floorplanner.com


After we were finished measuring all the walls and drawing it to scale we waited. And waited. We saved our $ and waited some more, until finally we had a budget in place to work with.

Follow me as I take you on our journey of finishing a basement into a family entertainment area.

Next up: sealing cement and painting brick. Oh what fun!

Friday, February 4, 2011

Versatile Valentine Dress

Today the voting begins for AMERICAN CRAFTER so make sure you go vote. If you don't vote at least go over and check out Amy's Blog it is filled with all sorts of fun projects and cute pics.

Here is my entry for the contest this week... I'm hoping it's good enough to continue on.

Theme:


As you can see this one dress can be worn MANY different ways. Making it perfect for everyone, every occasion and every body type.

We've all done projects with the kids in mind, this is something for the GROWN-UPS.

Valentine's Date

Casual and Conservative

Flirty and Fun

Color block Beach Party

This is the back view of the first picture showing the twist down the middle.


Here is a close-up of the strapless, I'm hoping you can see the straps and how they are wrapped around many times and then tied in a knot at the side.

Here are a few ways my inspiration shows how to wrap it:

 And here are some suggestions for styling:


This dress is a skirt with extremely long straps attached that you wrap and tie many different ways. It has only one seam around the waist, making this a very simple and quick project. From the beginner sewer to the seasoned seamstress this dress can be done in under an hour. My inspiration, Butter by Nadia, was $246. My final cost was less than $40. That leaves me $200 to go spend on shoes right? ;-)

I'm off to make a cream colored one and a red one. Oh and a blue one and... and... and. By the time I'm done with all of them I should be able to have a tutorial for you (I warn you now though-if I do a tutorial please excuse my sewing terminology, do-dad and thingamajig and other silly words will probably be in it.)

Have a wonderful weekend and keep your fingers crossed for me.

Wednesday, January 26, 2011

Big Brother Little Brother Gift

This past weekend we FINALLY made time to hang out with some friends' of ours. They recently were blessed with a new baby. (He is such a little cutie.) He was born just before Thanksgiving and it's almost Valentine's. Why did it take so long?

It seemed like every time one of us had the time it didn't work out for the other one. For instance, our family of five spent at least 5 weeks going through colds/coughs. Then when we were feeling better they had the flu. The holidays took up a lot of the time in between too.

We had a great time catching up. It's amazing how time flies by and what happens in that time. The kids had a blast with each other. Our girls got to play with boy toys: cars, tools, transformer thingys (not sure exactly what they were called). They have 2 little boys now, one more and we could do some arranged marriages. What's funny though, is out of all the toys available to them, they decided to play with chairs. Yes, chairs. What is it with kids? Boxes... Chairs... Pots and Pans... Why do parents even buys toys? The chairs kept them entertained for a good hour.

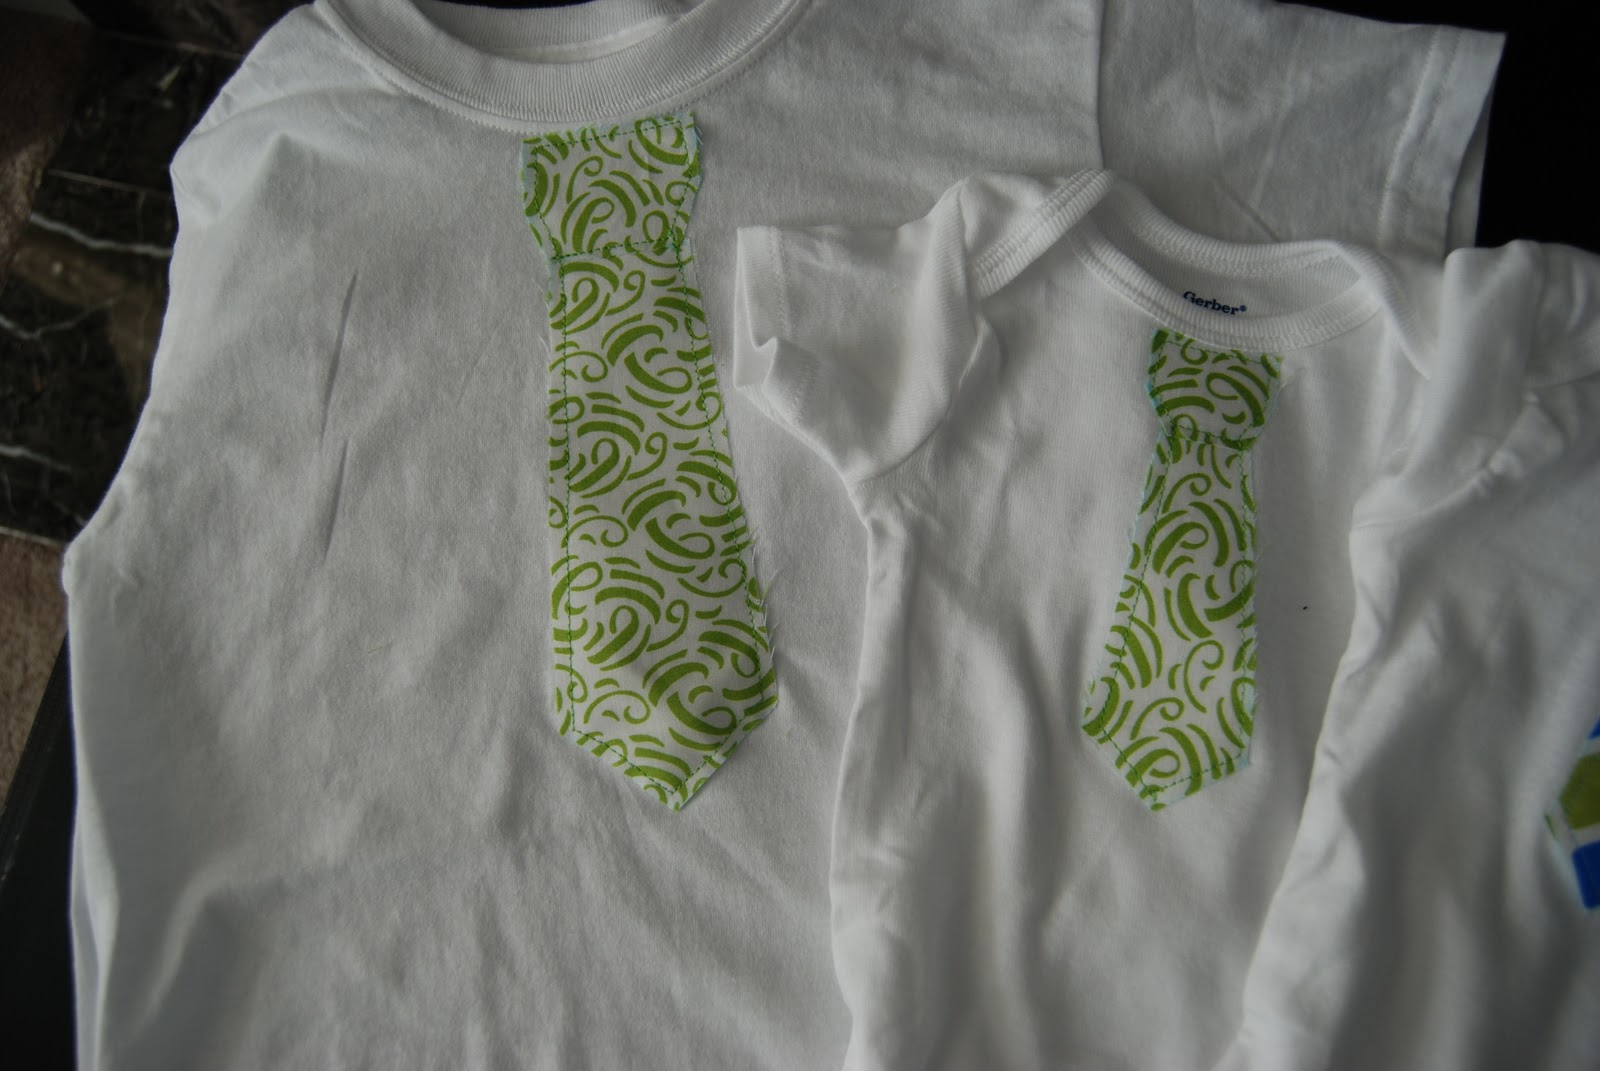
Here's what we took for the new baby and his big bro:


I found instructions here. Instead of using Char's template though, I made my own. I had a broken picture frame and the back stand looked like the bottom of a tie. I made the top of the tie freehand. These look even cuter on the little guys. I think I need to change irons, I did iron these before taking a pic, I promise.

PS. Don't forget to become a follower ;-)
Either through Google Friend Connect or Feedburner up there on the left.

Thursday, January 13, 2011

Gift Tags from repurposed cards

I know the holidays have been over for a bit now, but they're not really over until you have ALL of the holiday decor put away. In our house the tree and most all decorations come down the 30th of December, that way we are starting the new year fresh.

But we do have a couple of strays: the holiday photo card book and the card garland stay up until we are sure we won't be getting anymore cards that were lost in the mail. Today I took down all of the cards hanging from my card garland. (I'll show you how to make the "card garland" later in the year.)

And that means for us, the holidays are done. My house feels so bare. Everywhere I look there is a lack of color. The door no longer jingles with sleigh bells when it is answered. I can't read by Christmas tree light. I even put away the "Christmas Cranberry" candles.

Ok, I'm done being depressed.

"Cheap Trick of the Day"

As most of you know I have a hard time throwing stuff away, not like a hoarder, I just like to give a new life to stuff. So before you throw all those holiday cards into the recycling make your gift tags for next year.

Here's what I do:


I take all the cards and using whatever cutter I have handy I start cutting the cards up. I use my corner punch on some. Scissors on the big ones that won't fit in my personal paper trimmer. And a craft knife on the ones that have intricate designs. Some cards can even become multiple tags. When I'm done they look like this...


I started doing this a couple of years ago and have yet to buy gift tags because of it.

Monday, January 3, 2011

Cute Hair Accessories

As many of you already know, and the rest of you are finding out, I love to save money. I love making things for cheaper than I saw them in the store or online.  

Here is an example:

Flower Hair Accessory

Here's what I made:
 and this:
and this:

I came across this post by Beckie over at Infarrantly Creative and thought to myself, "Hey, I can do that!" But I think I may have done it cheaper than she did...

My grand total for all of it was $1.75 ($1.50 for the ugly top from Salvation Army that I took apart for the pretty sequins and $.25 for the felt to sew the sequins to.) I had these on hand: the headband, pony tail, and barrette. Also, needle and thread and some black beads for the centers. If I really did some math it would be cheaper than that because I only used a couple of small squares from the felt and have tons of sequins left to do more fun things with.

I think they turned out pretty cute and the girls loved them too.

Tuesday, December 28, 2010

A little something new for Mom to wear

I recently came to the conclusion that I didn't have anything to wear for the holidays. So I made a new top. Total cost $2.50. How did I do it? 

I took this:
A tank from Salvation Army (sweater knit) and some material I had left over from a dress

And turned it into this:

Here is a back view:

Anthropologie, The Buckle, and a few other well known overpriced stores are selling ruffled cardigans like hot cakes. So instead of buying one for $68 (sale price at Anthro.) I made mine for $2.50. What do you think, leave a comment and let me know. 


Monday, December 27, 2010

Happy Holidays!

I cannot believe that Christmas 2010 is over and the New Year is only days away. Our Christmas was wonderful, how was yours? (Or the holiday you celebrate this time of year.) Christmas morning was so much fun. The girls couldn't wait and neither could we (me or the hubster). I think the girls were more excited to exchange the gifts they've been trying to sneak a peek at, than the ones from Santa. Because of this we ended up doing the family gifts first and this surprise was part of the family gifts. A loved it so much that when we wanted to open Santa gifts, she kind of-but not totally-threw a tiny fit. M and C thought it was pretty awesome as well. Everyone that came to visit over the weekend was given a personal tour of the playroom and it's new addition by one or all three of the girls. So as promised, here is the post on this pretty cool Christmas gift. Sorry it is kind of long.

Here is a little recap of what I did up until Christmas in order to be ready for the surprise.

Crocheted Cupcakes-pattern Amigurumi World: Seriously Cute Crochet

Crocheted Apples-pattern Amigurumi World: Seriously Cute Crochet


$5.00 Faucet-Habitat for Humanity REStore

Free Entertainment Center-from soon to be brother-in-law

I took all of the above and a little more and turned it all into this.
Play Kitchen-Total Cost: $47.18 supply list at end of post.

Here are a couple pics I used for inspiration, but was NOT going to pay that much for.
Pink Vintage Retro Pretend Play Kitchen$169.99-Amazon
Pink Retro Kitchen and Refrigerator $250.99-Amazon

 
$249.00-$699.00 PB Kids

So...
First, I needed some tools. I needed a jig saw for the sink hole. And since I have wonderful friends, I was able to borrow one. Once I had the jig saw I needed a lesson on how to use it. So...called up dear dad and bribed him with a secret recipe. It worked. He was over here in 2 days and we made the exchange-jig saw lesson for secret recipe-muwhahaha. He must have really wanted that recipe, because as you can see I also learned how to use a holesaw.


Second, we needed to take the entertainment center apart and prime it with adhesion primer.

I had some luan board cut to size at Lowe's for free. I need two pieces: one to replace the glass in the door, and the other to cover the hole behind where the TV used to be.
We then painted everything pink. With the exception of the two small doors and the piece of luan for the glass replacement-these later became "stainless steel appliances".


I used a stainless steel bowl for the sink. Deadbolt locks became the knobs for the burners. Old PlayStation-1 games flipped upside down were used as burners, I painted the center red-so I guess they're always on and ready to cook up something tasty.


We changed the way the doors were hung so that they were more realistic. All hardware got changed from antique gold to brushed nickel.


There is a pantry on one end, which got filled with all the play food after the picture was taken.


And a refrigerator on the other end. This is also stocked and ready. I used a mirror for the "window" and we also put in an old wired telephone.


Supply List:

Entertainment Center-0 (given to us from soon to be brother-in-law)
Material for valance and small curtain-0 (leftover scraps from the curtains in playroom)
Primer-$10 (Sherwin Williams)
Pink Paint-0 (leftover from my craft closet-Sherwin Williams "Childlike")
Hinges-$2.94 (Lowe's-2pk for $1.47)
Burner Knobs aka Deadbolt Locks-$1 (Habitat ReStore-.25/each)
Handles and Knobs-$3.25 (Habitat ReStore)
Burners-0 (Playstation1 games from box in basement)
Sink-$4.99 (Meijer-mixing bowl)
Faucet-$5 (Habitat ReStore-cleaned up with Coca-Cola)
Mirror-$3 (Habitat ReStore)
Glue-0 (E6000 on hand in my stash-used to glue down burners)
Epoxy-$4 (Target-what we used to hang the mirror)
Silver Spray Paint-$3 (Lowes-"Aluminum")
Black and Red Paint-0 (Acrylic paint in my stash-used for burner centers and oven door)
Luan Board-$10 (Lowes-cut for free)
Grand Total: $47.18 savings of at least-$120 not too shabby :)

Have a great day!